Well Hello! I have been so busy posting many of my thrifty finds and our furniture projects that our House transformation posts have been few and far between. So as you know, or in case you don't if you are new here. Exactly 1 years ago (October 4th, 2013) my husband and I bought our current home and literally transformed every inch of the space. We are still transforming parts of it, because as homeowners does it ever really end? So today I am going to feature our kitchen. Hopefully one I week I will continue to feature one room of our home. The nursery has already been shown. I will try to link that in later! :) Here ya go, I will let the pictures do most of the talking. If you have any questions please write them in the comments. My husband is currently building a bookcase/window seat for a customer and I am hoping I can rope him into doing a step by step blog, but as of now he is not on board for doing that with the house updates as it would be way too time consuming. However, if you have any questions on how anything was done I am sure I can convince him to give you some help! :)
Alright, so first here are the before pictures of our foreclosure! Believe it or not, the pictures make it look WAY BETTER than it actually looked in person. First off, the filth was unbelievable. I don't know how the insides of someone's cabinets and drawers could get so filthy. And the cheap flimsy doors and the unstable countertops can't be conveyed in pictures, but believe me it was bad.
So here you see a swinging door to the right. What you don't see is that it was completely rotted out all around it. We knew we would need a new door and with a table going in to open area I don't know why anyone would have a swinging door there. So we chose to remove that door and replace it with a sliding glass door. Here you will also see how the back sides of the cabinets above the counters had doors. Not a fan of that at all. Those were removed. The countertop was also about to be completely revamped as it was hanging there by a thread. :)
I do love my view of the backyard out of these windows. :)
This is the hallway from the garage facing into the kitchen and family room. Needless to say we had a great deal of drywall repair to do. We did hire out the drywall work to be done by a professional. It wasn't that we couldn't have done it on our own, but we wanted to be living in the house by Thanksgiving and there was a great deal of drywall damage as the previous owners had ripped shelving out of the walls and there were large cracks in the ceilings so we wanted it done right.
The light oak cabinets just were not our style and they were absolutely filthy. In this photo the doors had already been removed from the cabinets.
Those photos show stage 1. They were literally the first photos we took. These next photos show stage 2 where work has begun. I will try to be as descriptive as possible as to what is happening in the photos.
Here you will see the water damage and pipes that needed to be repaired, as well as many drywall patches and plumbing work.
This photo shows the trim has been painted white as well as the cabinets. We also added beadboard to the ends of the cabinets to give them a more custom look.
In the photo below you can see how we leveled the countertop and used tiles. We were on a tight budget and because we could do the tile ourselves it saved us a great deal of $.
Once the tile was in, the cabinets were painted, and the walls were painted, we put a tiled backsplash behind the stove area, and all new hardware of the drawers and cabinets. We also put in a new chandelier and the new sliding French door. You can also see the new sink and faucet.
This picture was taken right before the floors were about to be redone.
The next step was the floors. They had water damage and were that ugly light oak that I hate. As I said we did all of this work ourselves (my husband, dad, and brother). But we did hire to have the floors done by a professional. He was reasonably priced and was able to complete our entire downstairs in one week's time. We are glad we made that decisions. In this photo you can see the floors had been re-stained and we are just waiting to add the cabinet doors and the new doors around the downstairs.
Now we are all moved in! :) Here is what it currently looks like. Don't mind all of the Halloween décor.
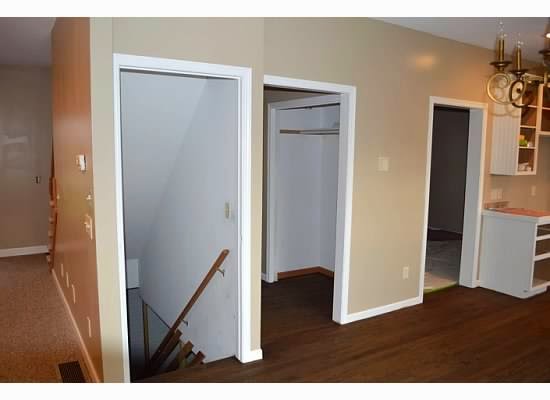
Looking down this hallway you can see we updated all of the doors to 6 paneled doors.
This is looking into the kitchen from the eat-in area. You can see we added beadboard to the backs of the cabinets and the ends to give them a more custom look. We also added decorative posts underneath the countertop for extra support as well as a decorative effect.
Don't the 6 paneled doors make a dramatic effect?
Our new sliding door...
I hope you have enjoyed the tour!